“My
name is Alice and I play a millennium mps 850. I use Logic Pro to record my
drums. I record myself playing using three different angles: one front, one
side and one above. I only have one camera so I take three separate takes and
then edit the videos together. This gives me an opportunity to edit together
the best playing out of the three takes. For example, if I play a fill in one
take and not in the other two, I’ll keep make sure that the fill is in the
final track.
I’ve started to use drumless tracks so my playing can be heard
without any double hits/overlapping from the original track. I use an app
called moises to do this. It’s not perfect but it does the job. I mix my own
drumming into the original song using the drums and plugins available on logic.
Once I’m happy with how it sounds, I bounce it and send the audio as an mp3
track along with my three recordings to my friend who has a bachelors in VFX
and he edits the videos together. I currently upload every Saturday, typically
after work so my upload times vary between 5-9pm UK time. Occasionally I’ll
upload on Sunday instead.”
Roland has released their new SPD-SX PRO model. This seems to be a big upgrade over the standard SPD-SX. The new version now features 32gb of internal storage, upgraded from 4, gives you higher sample rate, plus more inputs and outputs, a bigger screen, and fancier lights.
And this video sure does make it look fancy! This version will cost you $1199, while the original SPD-SX will cost you $879.
ALYJAMES LAB has really made one of the most impressive drum VSTs I have ever seen in my life. I'm sure if you're reading this, you know what Simmons drums are, but if not, they were the drum sound of the 80s, electronic drums that were not just pads playing samples, they truly were "electronic drums". As in, when you hit a pad on an SDS7 drum kit, you were actually triggering an analog synthesizer that created the sounds.
This is why in the past, most Simmons emulation never really sounded exactly like the real thing. Not that you can't make samples sound cool or good, but it's just a different technology all together. Analog synth-drums have all sorts of modulators that digital ones generally just don't have, such a velocity effecting pitch or modulation controls, filters and other things. This makes them have a very unique sound that is nearly endlessly customizable.
They DON'T sound like acoustic drums.... and they're not supposed to.
ALYJAMES LAB painstakingly recreated the internals of the old Simmons electronic drum modules inside of a plugin called VSDS-X for Mac and Windows that you can hook up to your modern electronic drum set. To say that this thing sounds good is an understatement. It truly sounds analog to my ears and absolutely amazing.
Below is a video I created with the plugin, then below that I put 65Drums amazing review of this plugin. (which was how I found out about it too)
Are you a drummer who has a cool e-drum setup you'd like to share? Are you making experimental music using e-drums or hybrid drums? Are you a sample pad drummer? I want to hear from you! Use the "general contact and submissions" form on the right to submit your content to be published on Alternative Drummer! Hope to hear from you soon!
YouTuber WIRECOOLEY has one of the nicest collections of vintage Simmons drums that I have ever seen. In addition to that, he really knows how to use them! Check out this recent post of him playing to some original music on his vintage SDX drum kit.
Not only does this thing look amazing, but the sound quality is also equally as great, especially considering the age of this kit. If you continue down WIRECOOLEY's past videos, you'll find a plethora of great performances on vintage Simmons gear.
One of my personal favorites is his cover of Talk Talk's "Tomorrow Started" that is expertly recreated with precise attention to details.
WIRECOOLEY, if you see this post we'd love to have a word with you for an interview on this blog.
Personally, I am glad to see Simmons gaining some traction again lately in the e-drum world with their recent kits like the SD1250. I expect to see some even better things from them in the future!
Of course, some of you may remember that Simmons tried to return to their roots of the hexagonal shaped drums with the epic failure The SD2000.
I'm not going to lie. I liked the SD2000 when it came out. I was pretty surprised when it tanked so hard. I know some of the sounds weren't the greatest, but I'm sure I could make it do some cool stuff. Now that it seems to be so universally hated, I kind of like it even more, haha. I would love to add one to my collection. I'm sure this kit will be valuable one day due to its weirdness. Mark my words.
As a music educator in the post-covid era, having a good online teaching setup is essential to a successful teaching business. When designing my setup, I had a few requirements. I wanted a way to use multiple cameras, have high quality sound, and be able to see and hear my students equally as well.
Part 1: The Hardware Components
Electronic drums
A decently powerful computer
Webcams
Tripods and stands
A mixer with USB or and Audio Interface
Headphones
Microphone
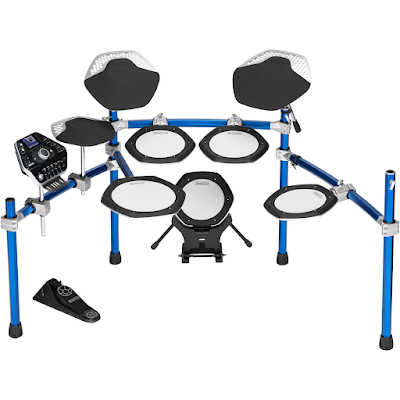
Electronic drums: You probably already have this part covered, but if you don't, I'll briefly touch on this topic here. The e-drum market has really grown in the past 10 years or so and there are more options than ever if you want to get an electronic drum set. The easiest piece of advice I can give you is to stick with known major brands such as Roland, Yamaha, Alesis, and Simmons. There are of course some great boutique brands out there such as ATV, Gewa, and EFNote, but going into details about all the different drums out there is outside the scope of this post. There are even some cheaper, lesser-known kits being sold on Amazon, some of which are not terrible, but it's much harder to go wrong just sticking to the well-known brands.
A decent computer: You are going to need a computer with at least an i5 processor (or equivalent), 8gb ram, and preferably one with a dedicated graphics card. Obviously higher specs will be even better. I am currently using a 2015 Macbook pro, which can reliably stream at 720p. PCs generally run OBS (streaming software, more on that in part 2) better than Macs, but Mac is finally starting to catch up in this regard. Gaming desktop PCs work really well for streaming applications, but not everyone (including me) have space to setup a desktop just for streaming lessons.
Webcams: You have several options here, but the webcams I am using are Spedal 1080p Wide Angle webcams. I like these cameras because they have a good image, are fairly inexpensive, and a very wide angle. Plus, they also work with both Mac and PC. You may also want some USB extension cables and a USB hub if you're using a laptop.
Tripods and stands: You're going to need some stands for your laptop as well as for your webcams. I recently picked up this great laptop stand that not only has a place of a laptop, but a nice accessory tray that can hold my mixer, and a gooseneck that can hold one of my cameras. For my overhead camera, I am using a standard boom microphone stand with this handy adapter that allows it to hold a webcam. Then for my bass drum cam I am using this SmallRig Camera Clamp that I just have clamped to one of my floor tom legs. You may not have a free standing floor tom though, so in that case you might want to just use a small tripod on the floor.
A mixer with USB: I'm using a Flamma FM10 which works great on Mac or iOS devices, however I do not recommend this mixer for Windows as the level indicators seem to be unreliable under Windows which can lead to digital clipping. Instead, I recommend trying a USB audio interface.
Headphones: Here there are many options again, but I really like these Samson SR850s for my drums. Do not use Bluetooth or wireless headphones for e-drums. The lag will make it impossible to play.
Microphone: Once again, you can use basically any mic you want, but I like these headset mics because they're wireless, cheap, and yout don't need a stand. If you are using that Behringer Mixer I posted above you could even use some kind of Gaming Headset mic/headphone combo which would be convenient.
That's really all you need as far as the hardware goes!
Part 2: Software and Configuration
A stable Internet connection
OBS
Avanced Scene Switcher
Virtual Cam
Google Duo (Meet) / Zoom
Getting all the equipment is the easy part, but hooking it all up and making it all work is where the challenge lies. Don't worry though, I'm going to walk you through the entire setup.
A stable internet connection: The importance of this cannot be understated. Stable internet is crucial to successful streaming or teaching online. A way to check your internet is by using a service like https://speedtest.net. You need to make sure you have at least Cable Internet, which is what I have. Fiber like Fios is even better, DSL will most likely not work so great. Also make sure your router is reliable and not dropping signal. If you are using wifi, which most of us are, make sure you are not too far away from your router or it will drop signal and make the performance less reliable. What about 5G? My experience trying 5G for streaming has not been good, so I would not recommend it.
OBS: OBS is free software for streaming and is currently the industry standard. It will run on any computer platform and works great. It's just a bit of a pain to make work the way you want, but once it's setup, you can pretty much just leave it alone then never have to worry about it again unless you want to make a change. After you download and install OBS, if you have a twitch or YouTube channel, you can go ahead and let the wizard do its thing. If not, just close the wizard and go right into the settings.
In the settings, go to the 'output' tab and make sure you have "hardware" selected for encoder. Depending on your computer you may have NVENC, Apple VT Hardware Encoder, or AMD Encoder, if you only have H264 as an option, you may need to set everything to a lower resolution for your computer to handle it. If you are broadcasting a 720p, then set your video bitrate to 2500, if you are broadcasting at full HD, then you will want to set your video bitrate to 5000.
After you have this setup, head over to the 'Video' tab and set your base and output resolutions to your desired resolution. This will depend on your computer power and internet speed. I am using 720p for both my canvas and output resolutions.
Once this is finished, setup some scenes in OBS and add your webcams as sources. You can setup different angles in different scenes. Once you have some scenes setup move on to the next section. If you're super confused right now, you may want to watch a few general OBS tutorials on YouTube before moving on.
If you want your webcams to switch automatically, head over here and download the Advanced Scene Switcher plugin for OBS. Once it is installed (you may have to restart OBS), click 'tools' from the dropdown menu in OBS then select Avanced Scene Switcher. Once inside go to the Macros tab and click the + to create a new macro. Here you can set the conditions for your scenes to switch. Watch my video below for a bit more details on how to do this. Once you finish setting up the macros, return to the 'general' tab of the Advanced Scene Switcher (ASS) and click start. Now your scenes should be switching automatically.
Once you're done with all of that, close the settings page and click the "Start Virtual Camera" button on OBS. Open up google meet, or whatever video chat app you are using and select OBS Camera as your webcam. Now all changes made within OBS will broadcast to your chat session!
Electronic drums are becoming more popular than acoustic ones in recent years. Don't believe me? Just go to your local guitar center and ask the people in the drum department which one they're selling more of. I think this mostly has to do with one main thing.... volume.
I started on acoustic drums, and they will always be my first love. However, I've gained a real love for electronic drums as well in recent years. After I had my first electronic kit for a year or so, (an Alesis Nitro) I started thinking how I would like to convert an acoustic kit into an electric one and started experimenting with ways to do this myself. I made a lot of mistakes, but through trial and error have come up with a lot of tips to help you do your A2E conversion successfully.
Essentially converting acoustic drums to electronic drums consists of 5 things
the drums
the triggers
hi hat controller
the module
the cymbals
There can be more to it than this as you will see in this post, but you can get away with this bare minimum. If you are looking for the most silent option, you can also get mesh heads to replace the mylar heads. Though you can actually convert drums using mylar heads, and make them much quieter than normal drums with household items.
1. Picking your drums: Though technically you can use just about any drum set. I have some tips on ones that will give you an easier time than others.
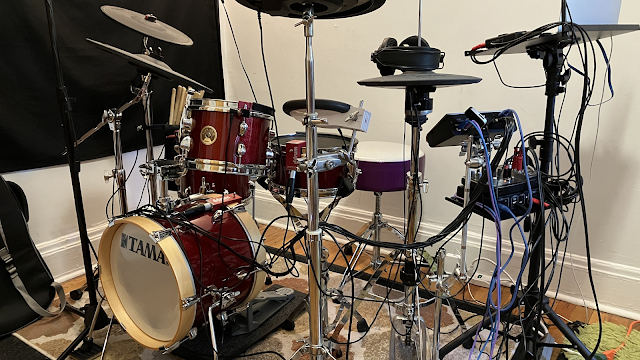
Smaller drums work better. When converting your drums to electronic, you're going to be using something called 'triggers'. More on this later, but these are the sensors that pick up you hitting the drums and sends those triggers to the module. They sense vibrations, but drums that vibrate too much can be a problem and cause double triggering, or just a general bad response. Larger drums vibrate more than small ones, so it's harder to get a good response out of them (not impossible, but definitely harder). The kit you see above is my tiny conversion kit made from a Tama Club-Jam Flyer, which is one of the smallest adult drum sets being produced today.
I actually made a video about what I think are the best kits to make into e-drums, you can watch that below.
2. Picking your triggers: There are many drum triggers on the market, and there are internal ones, and external ones. The difference is internal triggers go inside the drum, and external ones clamp on the outside of the drum. You can also make your own triggers, but I am not going to get into that on this post. Personally, I prefer external triggers for a number of reasons. The first reason being that it is just much easier install the external triggers. Also, major name brand manufacturers such as Roland, ddrum, and Yamaha don't really make internal triggers to sell commercially, but they all make external ones. Internal triggers are usually made by small companies, or DIYers who post them on places like Ebay and Reverb. Finally, I prefer external triggers because it is very simple to switch your drums back to Acoustic anytime you like with no permanent changes done to the drums. If your mind is set on internal triggers, I recommend Jobeky Triggers.
My favorite external triggers are ddrum triggers. Price and performance makes them a great choice. The ddrum Redshot pack is only $99 and comes with 5 triggers for Kick, 3 toms, and snare. They are all single zone though, but for the money you really can't beat them. If you want dual zone snare and better triggers in general, then ddrum's Pro Triggers are the way to go. This pack comes with a dual zone snare trigger, single zone tom triggers, and a nice hefty kick drum trigger. Keep in mind though, ddrum's pro triggers use XLR connections, so if you have a cable snake, you will need adapters like this to make them work. You also will not need the included cables in that pack, so you can buy this cheaper option that does not includ cables. If your module has 1/4" inputs, the included cables that come with the pro triggers in the first pack will work perfectly. Personally, I actually use a combination of Red Shots on my toms, and Pros on my snare and kick with adapters.
3. Hi Hat Controller: This will work in conjunction with your hi hat cymbal to tell the module when you are opening and closing the hi hat. For the sake of simplicity, I recommend using a Roland FD7, or FD8 and just keeping your hi hat cymbal on a normal cymbal stand. There are ways to convert a normal hi hat stand to electronic, but it is more expensive and there are many variables depending on which module you are using, so I will not be covering this here.
4. Picking the module: The module (sometimes called The Brain) is the electronic thing that actually makes all the sounds. You plug all of your triggers into the module, and when you hit the drum, the trigger tells the module you just hit it, and the module makes a sound. If you want to make your life easier, I highly recommend using a Roland drum module! Not because I think they sound better, but they have all kinds of fine-tuning adjustments that really help you dial in the trigger to make it work correctly with your drums. They also are the most compatible with 3rd party drums and triggers. There are other options out there such a Alesis, Yamaha, ATV, Simmons...etc... but if this is your first conversion, Roland will be the easiest and give you the least amount of headaches.
Another option is to use a computer trigger interface, and have your module basically be your computer, but for the sake of simplicity, and to have a stand-alone electronic drum set that does not require a computerI will not be covering this topic in this document.
Depending on your budget, you can usually find a Roland module that you can afford. But if you have a decent chunk of change to spend, why not get the best? The TD-50X is Roland's Flagship module. It is not cheap, but it is the only module you'd really ever need to buy for all applications. But if you're thinking "Are you nuts Justin? I'm not going to spend $3000!!!" Don't worry, there's a lot more options out there.
If you want to spend a lot less, The Roland TD-17 is an absolutely fantastic module for the money. You get sound quality that nearly rivals the TD-50 and a smaller footprint. One step down from that is the Roland TD-07. This is a great module still, just barebones as far as features and has less input and output options. If that's still too much money for ya, head to the used market like Reverb or Facebook Marketplace. There's some real gems of older Roland module that you can find for fairly cheap. The TD-5, this thing is old as dirt, but is still awesome. I regret selling mine. The TD-6, is less old, but still old, but also awesome. TD-9, TD-11, and TD-15s can be found at various prices, but all mostly cheaper than any current Roland Module (except the TD-07).
5. The Cymbals: I can't really think of any better electronic drum cymbal as far as bang for your buck goes, than Lemon Cymbals. If you want to get them at the best price, then you need to go through Alibaba. But these things are really good. Not just good for the money, they're just good. Go ahead and YouTube them, you'll see many people raving about them. The reason they're so good is they work nearly as good as Rolands but are like 1/5th of the price, it's insane. I've been using a Lemon Ride and two crashes for well over a year now, and they're all 3 still as good as they were new. Another option if you want to go dirt cheap and only have single zone cymbals, you can go with Pintech Cymbals. They make dual zone too, but those aren't as reliable, nor do they trigger as accurately as their single zone cymbals from my experience. But if you're using an older module, you might only have single zone inputs anyway. "Zones" refers to the place on the cymbal that can be struck to produce a sound, for example "bell zone", "bow zone", "edge zone". Some cymbals have 1 "bow zone", or 2 "bow and edge zones".
*6. Cables: This will totally depend on your module, because some of them will use cable snakes, some will need individual cables. If it's a module that needs a snake, make sure you get one that includes it. Replacement snakes can be pricy and they're specific to every module that uses them. Some trigger packs include cables like the one posted above in the trigger section.
*7. Mesh Heads: If you really want your drums to be quiet, you're going to need some mesh heads. You can get some Remo silent stokes, or something similar. But as I said before, there's ways around this. You can still use mylar heads, but if you do, I recommend removing your resonant heads, and taking off the batter head off and reseating it over some fabric from an old t-shirt or something to totally deaden the head. This still won't be as quiet as mesh heads, but will function fine and if you don't need to be super quiet, it's a really cheap way to go.
Putting it all together
Once you have everything you need, set it all up, hook up all the cables, get a good pair of headphones, turn on your module and head straight to the trigger settings options. Hit each drum and see how they are working. Some will no doubt be close to working perfectly, while others will be not working great or not at all. Don't worry, we'll fix that.
You will need to understand what every setting does:
Trigger type: You may not have the exact trigger type listed in your drum module's settings, but that's okay. Just try each one until you find the one that performs better than the rest. Then you'll "dial it in" from there.
Sensitivity: Adjust the sensitivity of the pad to regulate the pad response. Higher settings result in higher sensitivity, so that the pad will produce a loud volume even when struck softly. Sensitivity is personal preference. Some people want a realistic response, but others like metal drummers like high sensitivity to even out all of their hits to one volume. Personally, I like a realistic response and keep my sensitivity just high enough so when I strike the drum hard, it sounds full volume, but low enough so my ghost notes still sound like ghost notes.
Threshold: This setting allows a trigger signal to be received only when the pad is struck harder than a specified force. This can be used to prevent a pad from sounding in response to extraneous vibrations from another pad. Set this as low as you can without accidental triggering from other drums.
Scan Time: This is one of those settings that mostly exists in Roland modules and is one of the reasons why I recommend them. Since the rise time of the trigger signal waveform may differ
slightly depending on the characteristics of each pad or
acoustic drum trigger (drum pickup), you may notice that
identical hits (velocity) may produce sound at different
volumes. If this occurs, you can adjust the “SCAN TIME” so
that your velocity of playing can be detected more precisely.
As the value is set higher, the time it takes for the sound to be
played increases.
Mask Time: Another Roland exclusive setting. Mask Time is a way to eliminate double triggering. On a kick pad, for example, if the beater bounces back and
strikes the pad a second time immediately after the intended
stroke—or, like with acoustic drums if you leave the bass
drum beater against the head—it can cause a single strike to
“double trigger” (two sounds instead of the intended one).
The Mask Time setting helps to prevent such problems. Once
a pad has been hit, any additional trigger signals occurring
within the specified “MASKTIME” (0–64 msec) will be
ignored.
When set to a high value, it then becomes easy for sounds to
be omitted when the kick is struck repeatedly in rapid
succession. Set this to as low a value as you can.
Crosstalk (x-talk): This serves a similar purpose to threshold, but functions in a different way. The module tries to intelligently determine what is an intentional strike vs vibrations from another drum. Set this as low as you can without accidental triggering from other drums happening.
Rerigger Cancel: This is another way to handle accidental double triggering, similar to Mask Time, but can be a bit too aggressive if set too high. Set as low as possible. Personally, I like to use Mask/Scan time settings over Crosstalk and Retrigger settings if possible, but sometimes you need to use both.
It takes time to fully dial in your module to your triggers. Just make adjustments, play for a while, then adjust again. Keep doing this until you perfect your settings. If one trigger will not adjust correctly, then you may have some other issues going on. Make sure the drum isn't vibrating too much. You may need to deaden the head more by adding internal muffling, or increasing airflow.
Resonant heads are your enemy: The last thing you want on e-drum shells is resonance. So, you need to deal with those resonant heads. The easiest way is just to remove them completely. If you don't like the way that looks you can either cut giant holes in them, so you're basically left with a mylar ring just to hold the bottom hoop on the drum, or a non-destructive option is to take a couple paper towels, fold them in half, and lay them across the inside of the bottom of the drum on the resonant head. This works great on smaller drums, but once you have a drum 12" or larger, you may have to take a more aggressive approach like cutting or removing the heads.
I made a video very similar to this post a while back, but I have updated some things here, so go by this document first. You can also watch the video though to get some additional information! Thanks for reading, and good luck!